Electric Bicycle Technology
Geared Motor and Direct Drive in Comparison
Mid-Mounted and Hub-Mounted Motor in Comparison
EBS Power Management: Functionality and Advantages
Bottom Bracket: Assistance in Determining the Bottom Bracket and Overview of Our Bottom Bracket Sets
Battery Technologies: Cell Types Used by Ebike-Solutions
Geared Motor and Direct Drive in Comparison
| Geared Motor | Direkt-Drive |
|---|---|
| mostly have a freewheel » bike moves easier without support » example: Bafang, Mini-folding bike motor, PUMA, BMC | usually do not have a freewheel » small braking torque even when system is switched off » example: BionX, Crystalyte |
| assembled from many components | assembled from less components » more robust |
| usually constructed as planetary gear | externally rotating motor » housing rotates without interconnected transmission |
| no recuperation possible (when motor does have a freewheel) | recuperation possible (when motor does not have a freewheel) » energy recovery possible |
Geared Motor
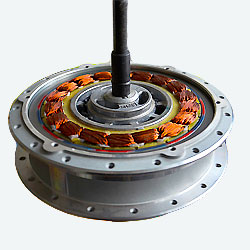 Design:
In contrast to the direct drive, this motor does not rotate along with the wheel but only its housing. Inside, the motor possesses gears usually a planetary gear that is driven by the motor inside of the housing. In doing so the motor on the inside rotates faster than the housing. The gears adapt the motor's high rotational speed to the low rotational speed of the wheel. Because of that the torque can reach high numbers even with small housings. The geared motor is always smaller than a direct drive with the same torque.
Hall Sensors:
Some geared motors need hall sensors for activation to recognize the motors position and put it into motion. These sensors offer the advantage of a higher starting torque because the motor can start running with high power from the very beginning.
Differences to Direct Drive:
Almost all geared motors use a freewheel due to which they do not feature a braking effect when riding without electric support. However they loose recuperation capability. Due to its complicated construction a geared motor uses more components than a direct drive making it more prone to failure. Depending on manufacturing quality a running geared motor can be louder than a direct drive.
Direct Drive
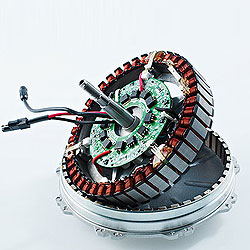 Design:
A direct drive mostly is constructed as an externally rotating motor. Magnets are attached to the inside of the housing. While the bike is in motion the housing will rotate completely since it's part of the wheel. To achieve higher torque the housing needs to be built lager, accordingly. So there's no wonder why direct drives are generally somewhat heavier than the small and light geared motors. There are manufacturers like BionX who try to compromise between power, site and weight to produce big but light motors. You need to take into account that improving one factor will result in the restricting of another.
Hall Sensors:
non-geared motors usually can be used with or without hall sensors. Without hall sensor the risk of failure is reduced because of the lower number of parts. Hall sensors increase the starting torque since the controller always has exact data about the position of motor and magnets.
Differences to the Geared Motor:
The fact that the direct runner always rotates along has advantages and disadvantages. A slight braking torque occurs when the electrical support is switched off while driving. The amount of braking torque depends greatly on the engine model, but is always present. The advantage of direct banks is the recuperation. When braking or driving downhill, energy can be fed into the battery if the controller and battery are set up for this. This saves energy for the direct runner while driving and protects the mechanical brake.
Mid-Mounted and Hub-Mounted Motor in Comparison
The Mid-Engine Conversion Kit
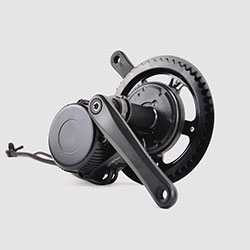
Mid-engines are installed in the area of the bottom bracket and drive the chain rings directly. The central position of the mid-mounted motor ensures an ideal e-bike weight distribution and a natural driving experience.
Advantages of the Mid-Engine Conversion Kit
The main advantages of an electric drive with a mid-mounted motor are the low centre of gravity and the possibility of using the gears. Due to the upstream gearshift, the electric motor almost always operates in the ideal speed range. So it also has a high efficiency on the mountain. Due to its mounting position, the mid-mounted motor can be used with any gearshift and is also compatible with roller brakes and a hub dynamo. In addition, the electric bicycle rear set with center motor is very compact: both controller, PAS disc and pedal sensor are already integrated in the motor. This simplifies the re-fitting and ensures a clean e-bike look with only a few cables.
Disadvantages of the Mid-Engine Conversion Kit
The greatest disadvantage of a mid-engine drive is the greatly increased wearing of all switching and drive components, especially when switching under load. This leads to additional costs and shorter maintenance intervals. Typically, these electric motors have an integrated gear that translates human tread power before the chain pinion is driven. When the battery is empty, this leads to a significantly higher pedalling resistance and can make it more difficult to cycle with the electric drive switched off. Mid-mounted motors also allow only one chainring on the bicycle, which reduces the number of gears possible and limits the variety of gear ratios. In addition, the efficiency decreases significantly when the drive train is dirty, which shortens the range of the electric bicycle. Energy recovery (recuperation) is not possible with mid-engine drives.
In order to be able to rearrange a bicycle with a mid-engine, the frame must meet certain requirements. You can find more detailed information about the conversion with our Bafang mid-engine electric bicycle retrofit kit on our Mid-engine consulting page.
The Hub Motor Conversion Kit
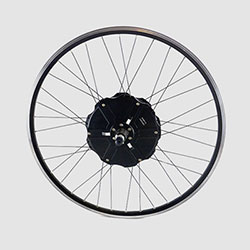
Hub motors are installed in the central hub of running wheels. They represent the most direct way to drive a wheel and are used in the front wheel and rear wheel.
Advantages of the Hub Motor Conversion Kit
Electric bicycle trailers with hub motors are reliable and low-maintenance.
Unlike mid-mounted motors, there is no increased wear of the drive components (chain, sprocket, etc.). In addition, these electric motors are characterized by low weight and low rolling resistance. Direct drive motors also permit range-enhancing energy recovery (recuperation) and protect the mechanical brakes. With the right controllers, they are sometimes incredibly quiet, extremely durable and can withstand high loads for short periods of time. In addition, almost any bicycle can be equipped with a hub motor and the number of chain blades does not have to be reduced.
Disadvantages of the Hub Motor Conversion Kit
The hub motor e-bike kit contains more components, which makes the conversion to an electric bicycle more time-consuming. With a hub motor drive you have to keep in mind that as many gears on the bike are possible, as with a mid-engine drive. However, it always depends on whether the motor is installed in the front wheel or in the rear wheel. The two drive types differ in some characteristics such as weight distribution and conversion complexity.
Retrofit Kit with Electric Motor in Front Wheel
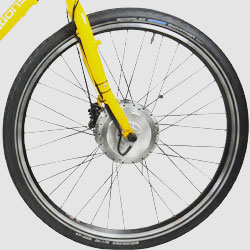 Electric motors, which are installed in the front wheel, impress by a simple assembly, since the gear shift does not have to be changed. This means that the bicycle can be changed quickly and the front wheel can be easily changed in the event of a puncture. If the electric motor is combined with a rechargeable battery, a well-balanced weight distribution on the e-bike is also achieved. Another advantage of the front wheel motor is the "all-wheel drive": the front wheel is moved by the electric drive, the rear wheel by the muscle power of the rider. This improves traction when driving on slippery roads.
Retrofit Kit with Electric Motor in Rear Wheel
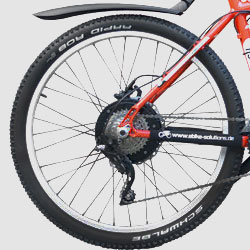 Electric motors that are installed in the rear wheel have a very good traction, since the weight of the electric drive is mainly concentrated on the rear wheel. With the centre of gravity at the rear, you also get the best transmission of power. This is why these electric motors are particularly suitable for a sporty riding style. The more discreet appearance and compatibility with a hub dynamo also speak in favour of the rear-wheel drive. However, retrofitting a rear-wheel motor is a bit more time-consuming, as the gears may have to be readjusted. In addition, these electric motors are only compatible with derailleur gears, but not with hub gears (Rohloff), since the motor occupies this space. After the conversion to an electric bicycle, however, the gears are used much less often.
EBS Power Management
The EBS Power Management allows you to adapt the driving behaviour of your electric bike particularly well to your requirements. With the help of this technology you can regulate the strength of the motor support yourself. This allows you to fine tune and customize the power setting. This allows you to choose at any time whether you want to start gently or vigorously.
And this is how it works:
Instead of always driving at maximum power, the output of the engine power can be controlled via the EBS power control: the higher the stage, the greater the engine support. This makes the transition between the individual steps significantly more fluid and the driving behaviour more natural. The EBS power control also affects the range of the pedelec. Since the motor runs in lower stages energy-saving, the battery is conserved and lasts longer.
Advantages of EBS Power Management at a Glance:
The indicated values are valid for pedelecs.
| Systems without EBS Power Management | Systems with EBS Power Control |
|---|---|
| Engine always delivers full power | Motor power is dosed |
| each step has a max. speed: steps 1-5 are limited by speeds | each step has a max. speed: steps 1-5 are limited by current (A) |
| immediate delivery of full engine power up to the maximum speed limit of the stage | constant increase of the engine power up to the power limit of the stage |
| Motor always operates with maximum current in the stages (e.g. pedelec 15A) | Motor increases its power with each stage: stage 1 = 3A, 2 = 6A, 3 = 9A, 4 = 12A, 5 = 15A |
| no control of the motor power (= always the same current per stage) | Control of the motor power by selecting the stages (=selection of the current strength) |
| Start-up speed always the same (=start-up with 15A) | Adaptation of the approach speed by selecting the steps (= approach to step 1 with 3A, step 2 with 6A,…) |
| » sudden start-up | » selection of soft or fast start-up |
| » noticeable step change | » fine step transition |
| »more natural driving experience | |
| » greater driving control |
Overview of the EBS 250W Pedelec Conversion Steps
The individual stages are limited by the current as follows:
| EBS 250W Pedelec Conversion Kits | Power levels 1-5 |
|---|---|
| EBS Plug & Drive - 250W Pedelec Conversion Kit | Stufe 1 = 3A, Stufe 2 = 6A, Stufe 3 = 9A, Stufe 4 = 12A, Stufe 5 = 15A |
| EBS PUMA - 250W Pedelec Conversion Kit | Stufe 1 = 3A, Stufe 2 = 6A, Stufe 3 = 9A, Stufe 4 = 12A, Stufe 5 = 15A |
Bottom Bracket
The large part of the bicycle bottom bracket can be divided into one of three types: Square, Hollowtech II and Octalink. We have developed a suitable solution for each of these bottom bracket types so that you can convert your bike quickly and easily. Simply follow these two steps to find the right components for your conversion.
Step 1: Recognizing the bottom bracket
The following table and the pictures show you which bottom bracket is installed in your bike. You will need this information to select the correct pedal sensor (PAS).
Square Taper Bottom Bracket
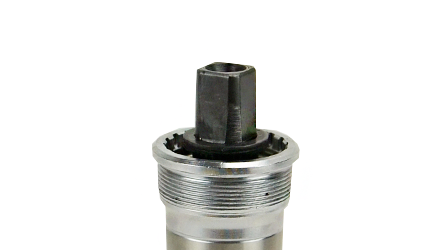 | 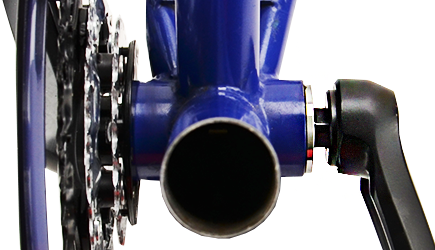 |
| Distinguishing feature: The axis, seen from above, is easily recognizable. The crank axle has exactly four flattened sides. | |
Hollowtech II Bottom Bracket
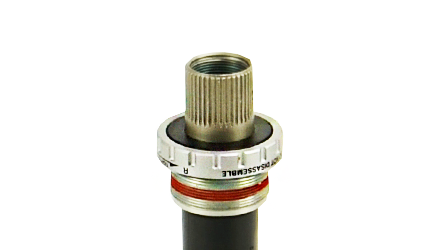 | 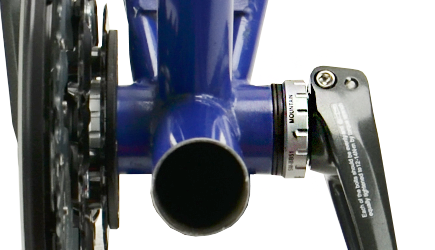 |
| Distinguishing feature: The axis, seen from above, is not visible. The crank lies directly on the bearing and is fixed from the outside by two bearing shells. | |
Octalink Bottom Bracket
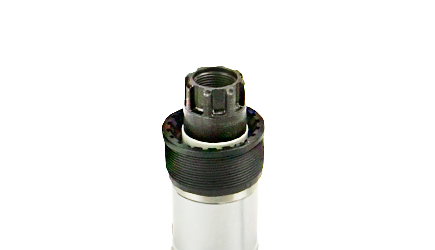 | 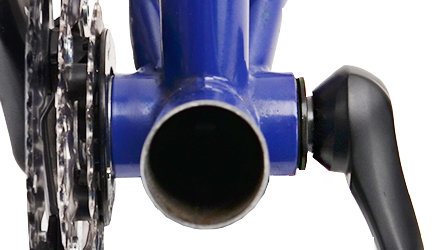 |
| Distinguishing feature: The axis, seen from above, is easily recognizable. The crank axis is round. | |
Step 2: Choose the Right Components
Now you know which bottom bracket is installed in your bike and can read the respective section. If there is no room to mount a pedal sensor with a clamp and the cable guide runs out under the bottom bracket, read the section "Mounting under the bottom bracket".
- to the Square Taper cadence sensor set
- to the Hollowtech II cadence sensor set
- to the Octalink cadence sensor set
- for mounting under the bottom bracket
Square Taper - Cadence Sensor Set and Mounting Tools
With the square bracket you can choose between the following solutions:
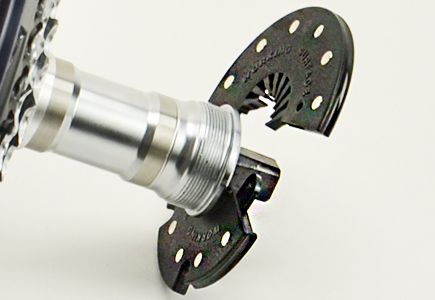
Cadence Sensor Set for Tool-Free Installation
- suitable if the distance between crank and axle is max. 8 mm.
- Mounting: no disassembly of the bottom bracket thanks to divisible PAS disc and pedal sensor for adhesive mounting
- Components included: EBS IPS/IES pedal sensor for adhesive mounting left
EBS IPS/IES pedal sensor for adhesive mounting right
divisible PAS disc with 12 magnets for square axes
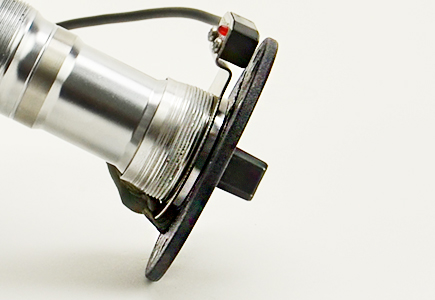
Cadence Sensor Set for Professional Mounting
- basically suitable for a square bottom bracket
- Mounting: PAS disc for mounting on the axle and pedal sensor with clamp
- included components: EBS IPS/IES pedal sensor with clamp left
EBS IPS/IES cadence sensor with clamp right
PAS disc with 12 magnets for square axes
Tool for Square Bottom Bracket
Cadence Sensor Set for Tool-Free Installation
Cadence Sensor Set for Professional Mounting
Hollowtech II - Bottom Bracket-Set and Mounting Tool
With the Hollowtech II bearing, first check how many sprockets your crankset has. For 3 sprockets, the choice of pedal sensor set depends on the number of teeth of the smallest sprocket. For single and double cranksets, the PAS disc must be attached directly to the crank. The pedal sensor with clamp is clamped under the right bearing shell.
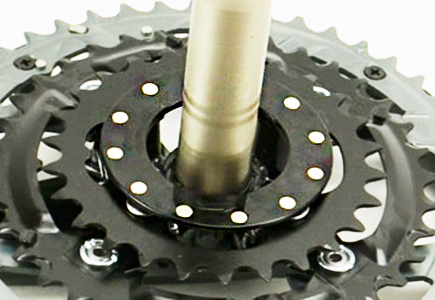
Cadence Sensor Set for 3-speed Cranksets with Smallest Chainring of 22 Teeth
- Mounting: PAS-disc with lugs for attachement to the chainring and cadence sensor with clamp
- Included components: EBS IPS/IES pedal sensor with clamp right
PAS disc with 12 magnets for chainring with 22 teeth
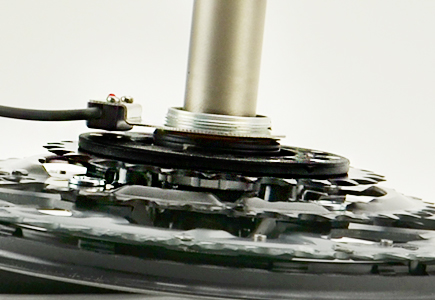
Cadence sensor set for 1 - 3-speed cranksets with smallest chain ring of 24 or 26 teeth
- Mounting: PAS disc with magnetic adhesion to chainring and pedal sensor with clamp
- Components included: EBS IPS/IES pedal sensor with clamp right
PAS disc with 12 magnets for chainring with 24 or 26 teeth
Cadence sensor set for 3-fold 4/5-arm pedal cranks
- Mounting: PAS disc with magnetic adhesion to chainring, adapter and pedal sensor with clamp
- Included components: EBS IPS/IES pedal sensor with clamp right
PAS disc with 12 magnets and adapter for 3-fold 4/5 arm pedal cranks
Tool for Hollowtech II bottom bracket
Octalink - Cadence Sensor Set and Mounting Tool
With the Octalink bearing, first check how many sprockets your crankset has. For 3 chainrings, the choice of the pedal sensor set depends on the number of teeth of the smallest chainring. For single and double cranksets, the PAS disc must be attached directly to the crank. The pedal sensor with variable clamp is attached to the seat tube with cable ties.
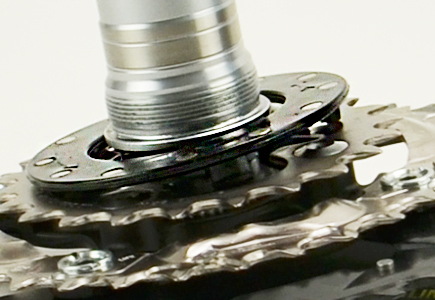
Cadence sensor set for 3-speed cranksets with smallest chainring of 22 teeth
- Mounting: PAS disc with lugs for attachement to the chainring and pedal sensor with variable clamp
- Included components: EBS IPS/IES cadence sensor with variable clamp right
PAS disc with 12 magnets for chainring with 22 teeth
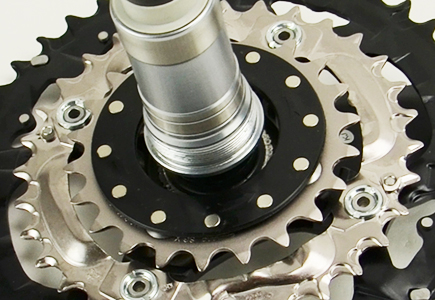
Cadence sensor set for 3-speed cranksets with smallest chainring of 24 or 26 sprockets
- Mounting: PAS disc with magnetic adhesion to chainring and pedal sensor with variable clamp
- Included components: EBS IPS/IES pedal sensor with variable clamp right
PAS disc with 12 magnets for chainring with 24 or 26 teeth
Cadence sensor set 1-fold and 2-fold crankset sets
- Mounting: PAS disk for adhesive mounting on crank and pedal sensor with variable clamp
- Included components: EBS IPS/IES pedal sensor with variable clamp right
PAS disc with 12 magnets for chainring with 24 or 26 teeth
Tool for Octalink Bottom Bracket
Hollowtech II and Octalink Bottom Bracket: Mounting under the Bottom Bracket
This set is suitable for all bicycles whose tension guide runs along the underside of the bottom bracket or which do not have enough space between the chainring and frame for a pedal sensor with clamp. A hole is required on the underside of the bottom bracket for mounting. For bicycles with bottom tines, the existing bore can be used. The set is suitable for a Hollowtech II and Octalink bottom bracket with a 3-speed crankset with a smallest chainring of 22 teeth.

Cadence sensor set for 3-speed cranksets with smallest chainring of 22 teeth
- Mounting: PAS-disc with lugs for attaching to the chainring and pedal sensor for bottom bracket mounting
- Included components: EBS IPS/IES pedal sensor for bottom bracket mounting
PAS disc with 12 magnets for chainring with 22 teeth
Tool for Hollowtech II / Octalink Bottom Bracket
Battery Technologies
Why does Ebike Solutions only offer lithium-ion batteries? The lithium ion technology is superior to other technologies in virtually every respect. Since we want to offer our customers only the best, we consistently do without other battery technologies. Here you can see a comparison of different battery technologies:
| Power Density | Life Span | Voltage Level | |
|---|---|---|---|
| Lithium-Ion (LiIon) | + | + | + |
| Nickel-Metal Hydride (NiMH) | o | o | o |
| Nickel Cadmium (NiCd) | - | - | o |
| Lead (Pb) | - | - | - |
Battery Chemistry
For lithium-ion batteries, different batteries can be distinguished. Ebike Solutions uses cells containing lithium manganese oxide (LiMnO), lithium nickel manganese cobalt (LiNiMnCo) and lithium nickel cobalt aluminum (LiNiCoAlO) chemistries.
Cell types Used by Ebike Solutions
For a long-lasting, safe and powerful battery, not only battery technology and battery chemistry are decisive, but also the manufacturer. Suppliers of cheap cells with a cycle life in the four-digit range frequently advertise. In fact, these cells are often poorly processed and do not achieve the claimed number of cycles by far. Ebike Solutions relies exclusively on carefully tested cells from selected manufacturers. The manufacturers of the cells we use are among the best in the world. Thanks to their experience and high manufacturing standards, they are able to constantly offer battery cells of excellent quality.
We use NCRP2 cells as standard in battery construction, as they offer an excellent combination of energy density and voltage level. The cells are designed as solid cup cells and are equipped with a pressure relief valve. They do not catch fire in the event of overcharging and they do not explode. The cells have the format 18650, i.e. the dimensions are approx. 18 mm diameter and 65 mm length. The weight per cell is about 45 g.
The NCRP2 is only surpassed by the new cells of the NCGA type.
| *depending on the discharge rate. | EBS18650NCGA | EBS18650NCRP2 |
|---|---|---|
| Energy Density | +++++ | ++++ |
| Life Span | +++ | +++ |
| Voltage Level | +++ | +++ |
| Rated Capacity (Ah) | 3,45 | 2,9 |
| gravimetric energy density single cell (Wh/kg) | 270 | 230 |
| gravimetric energy density im pack* (Wh/kg) ca. | 220 | 190 |
| volumetric energy density im pack* (Wh/l) ca. | 460-530 | 350-400 |
EBS18650NCRP2
This high-tech cell has excellent energy density and is also high-current; Ebike Solutions uses the EBS18650NCRP2 as standard for all self-assembled batteries. This cell type is ideal for light and powerful e-bike batteries due to its very good voltage level, high cell capacity and fast charging capacity. Battery packs from these cells contain a protective circuit board (BMS) that adjusts cell voltages as needed and shuts down the battery in the event of overcurrent, overvoltage and after full discharge.
Custom Designing our EBS Battery Packs
We build batteries from solid cylindrical cells. We usually do not use foil-wrapped polymer cells, since these are mechanically unstable and can bulge by ageing. The EBS18650NCRP cells use Lithium-Nickel-Cobalt-Aluminium (LiNiCoAlO) as their battery chemistry.
Arranging cells in a square pattern makes the most sense in battery construction. Cells can also be arranged hexagonally in a honey comb shaped pattern, but that makes manufacturing more complex and therefore more expensive. Of course we can fulfil any other demands, like using a certain cell type, a separate charging port, a balancer exit according to Schulze-standard and much more.
Send us an email about your ideas or call us.
Why Does Ebike Solutions Not Use LiFePO4 Cells as Standard?
We only use LiFePO4 cells, also known as lithium-iron-phosphate cells as very rare exceptions. Batteries using LiFePO4 technology offer several disadvantages. First, with the same energy they are up to twice as heavy and twice as big as a LiNiCoAl-Oxide battery. Second, a LiFePO4 battery with the same energy is about 50% more expensive. There\'s cheap iron-phosphate batteries in the market, yet these do never reach the claimed amount of charging cycles, since their cells do not offer the required quality. Therefore we only recommend hi-quality batteries, yet these, of course, have their price.
LiFePO4 based batteries only make sense when significantly more than 1000 charge/discharge cycles are needed. Our standard batteries already provide you with range of up 40,000km (25,000mls) at around 700 cycles. Mostly batteries will be rendered useless by unavoidable ageing not by too many charging cycles.
Iron-phosphate batteries age about half as fast as LiNiCoAl-Oxide batteries. Yet buying an expensive iron-phosphate battery mostly doesn\'t pay, since battery technology advances very fast. Every year batteries become about 5-7% lighter and smaller at the same capacity. Therefore Iron-phosphate batteries become obsolete during their lifespan. It makes more sense to invest in a smaller and lighter LiNiCoAl-oxide battery. When after a couple of years the battery is used-up you can profit from the progress made in the meantime by buying a new battery that now provides up to 40% more capacity.
What Does Battery Management System (BMS) Mean?
BMS is an electronic circuit for battery monitoring. It increases a battery pack's safety by making sure that all cells are operated within the permitted voltage range only. When current is too high, temperature is too high or one line of batteries inside the battery is outside the permitted voltage range the charge output will be switched off. This avoids total discharge of the battery during normal operation. Caused by unavoidable self discharge, an insufficiently charged battery can drop to a too-low voltage level. These can be avoided by recharging the battery. Find further information about total discharge here.
An integrated Balancer insures that any differences in voltage between single cells are equalized. The occurrence of these voltage differences is called "drift" and results in the fact that the affected battery cannot supply its full capacity anymore. This problem can be avoided by balancing the battery. In most cases batteries will only be balanced until the end of the charging process, depending on the BMS architecture. Therefore it is recommended to occasionally charge the battery to full capacity
In case of a problem with the charging device the BMS makes sure that the battery cannot be overcharged. A capacity gauge maybe included to display the remaining capacity.
Custom-Tailored Battery Packs
You need a special battery? We build batteries to your requirements, supply lithium cells for do-it-yourself configuration and we also repair your old battery. This is what's possible:
- Several rated voltages (24/36/48V and more)
- different shapes, e.g. to fit into a housing or bag
- Fitting new cells into old battery housings, if possible.
- Lithium cells and accessories with desired electrical features
Tell us your wishes and we will make you an individual offer.
You don't need to be an expert: Tell us your requirements and we will find the best solution.
